Google Webmaster Tools is a free service I use which provides me with data that helps me to understand how well my blog is set up and how Google sees my blog from a search engine perspective.
It incorporates various tools that cover different aspects of my site which can assist me on improving the performance of my blog, whilst also warning me of any potential problems.
To use this tool you first need a Google Account. Once your Google Account is set up you can then log in to your Webmaster Tools Account and proceed with the website verification process.
Google Webmaster Tools Site Verification
When logged in to Webmaster Tools, click the “Add a Site” button on the top right.

In the pop-up box enter the site you want to manage then click “Continue”. For this example I’m using my test site.

Next you need to verify ownership of the site you have just added. In the following example Webmaster Tools has recommended using Google Analytics for website verification. If you already have Google Analytics set up correctly, then all you have to do is click on “Verify” and that’s it done.
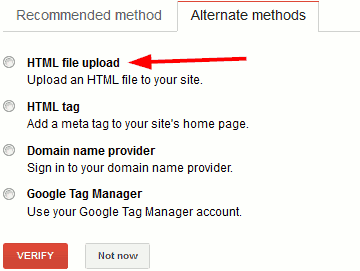
If Google Analytics is not set up on the site you want to verify and you have no intention of doing so, or you do not want to use this method for verification, then select the “Alternate methods” that I have pointed out below which will give you additional options to verify your site.

If your theme has an option to insert meta tags from your dashboard you could use the “HTML tag” verification method. I use the Genesis Framework which has a custom header and footer field that makes it very easy to add the meta tag if I ever decide to use this verification method.
If your theme does not have this option it would involve adding the code directly into a file within your theme.
I have quoted Googles own instructions of where to add the meta tag:
“paste it into your site’s home page. It should go in the <head> section, before the first <body> section.”
Always take extreme care when editing your theme files as one bit of code in the wrong place could cause your site to crash. If you are not happy about doing this there are plugins available to make it a safer process.
From the alternative options I will show you how to use the “HTML file upload” verification method. Of the Google site verification options available this is my preferred choice that I use to verify my sites.
At the time of writing I have not looked into the “Domain name provider” and “Google Tag Manager” options.
Ok, moving on, select “HTML file upload” as shown below.

Next download the HTML verification file to your PC.

How to Upload a Google HTML Verification File to a Website
Now you need to upload the verification file to your site. To do this you have to set up a connection with your hosting provider.
Before setting up the connection I strongly advise you to back up your site … just in case!
If you do not know how to set up a connection, the following post explains how I connect to my hosting provider: How to Create a Secure FTP Connection with HostGator
If you are not using HostGator the procedure of setting up this type of connection is the same no matter what hosting company you use, as long as they allow you to connect to them using FTP.
If you are using HostGator you can also upload files by using their file manager, check out this post: How to Use HostGator File Manager
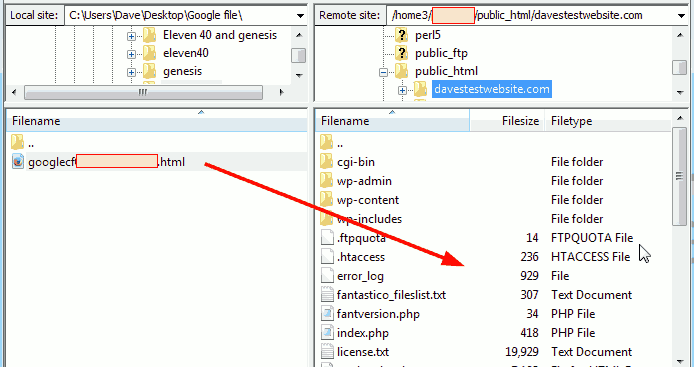
In the example below I have connected to HostGator using a Secure FTP connection.
On the left is the downloaded Google verification file and on the right are the files of the test website.
To upload the verification file you could either right click on the file name and select “Upload” or drag the file across to a blank area as I have pointed out.
Please note the verification file should not be installed in any subfolders.

Below is a screen shot after the file has been uploaded.


Hi Dave, first, many thanks for this very helpful post! I just did a first pass of verifying my site–successfully, it seems–but the result raised two questions for me:
(1) I entered my URL and clicked Confirm, per your instructions, but then I immediately received the “Congrats” message from Google. Do I nevertheless still need to upload a verification file to my site? … And if so, since it didn’t provide that step, how to I get to it in WT?
(2) Do I need to add BOTH the www (for me, it’s the canonical version) and non-www versions of my site to Webmaster Tools?
Thanks a million!
Play
Hi
You only need to use one method to verify your site so you wouldn’t need to upload a verification file.
As for adding both the “www” and non “www version”. You may need to this if you want to specify a preferred domain in Webmaster Tools.
Take a look at this link – https://support.google.com/webmasters/answer/44231?hl=en
If you want your site to appear as “www” in the search results make sure it is set as this in your WordPress general settings as well as your Webmaster Tools settings…the last thing you want to do is confuse Google!
Found another link to help you with this:
WordPress canonicalization guide
Cheers
Dave